

2.3.7 Packet Tracer – Navigation du IOS (Version de l’instructeur – Packet Tracer optionnel)
Instructor Note: La couleur de police rouge ou les surlignages verts indiquent le texte qui apparaît uniquement dans la copie de l’instructeur.
Topologie
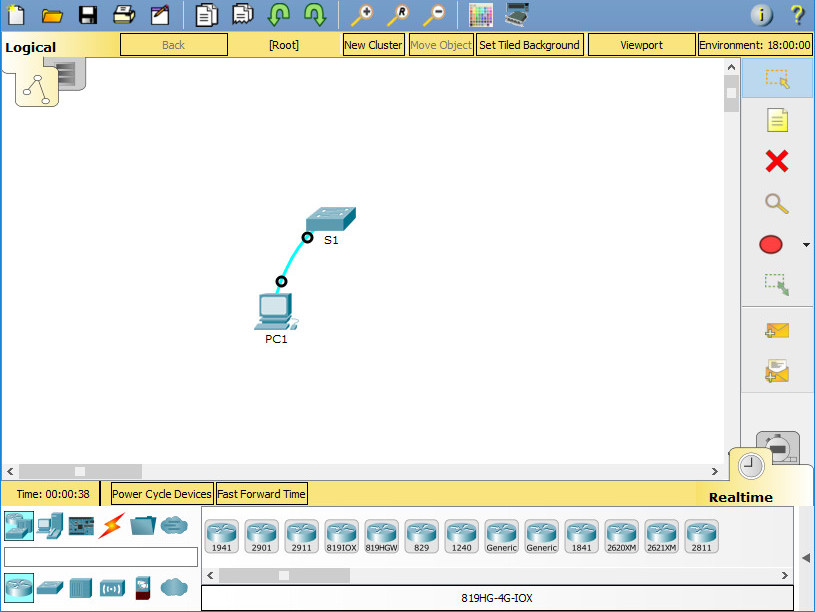
Objectifs
- Partie 1: Connexions de base, accès au CLI et exploration de l’aide
- Partie 2: Exploration des modes EXEC
- Partie 3: Réglage de l’horloge
Contexte / Scénario
Dans cette activité, vous pratiquerez les compétences nécessaires pour naviguer dans le Cisco IOS, y compris les différents modes d’accès utilisateur, les différents modes de configuration et les commandes courantes que vous utilisez régulièrement. Vous pratiquez également l’accès à l’Aide contextuelle en configurant la commande clock.
Instructions
Partie 1: Connexions de base, accès au CLI et exploration de l’aide
Étape 1: Connecter PC1 à S1 en utilisant un câble de console.
- a. Cliquez sur l’icône Connections (celui qui ressemble à un éclair) dans le coin inférieur gauche de la fenêtre Packet Tracer.
- b. Sélectionnez le câble de console bleu clair en cliquant dessus. Le pointeur de la souris changera en ce qui semble être un connecteur avec un câble qui pend.
- c. Cliquez sur PC1. Une fenêtre affiche une option pour une connexion RS-232.
- d. Faites glisser l’autre extrémité de la connexion de la console vers le commutateur S1 et cliquez sur le commutateur pour afficher la liste des connexions.
- e. Sélectionnez le port Console pour terminer la connexion.
Instructions:
1:
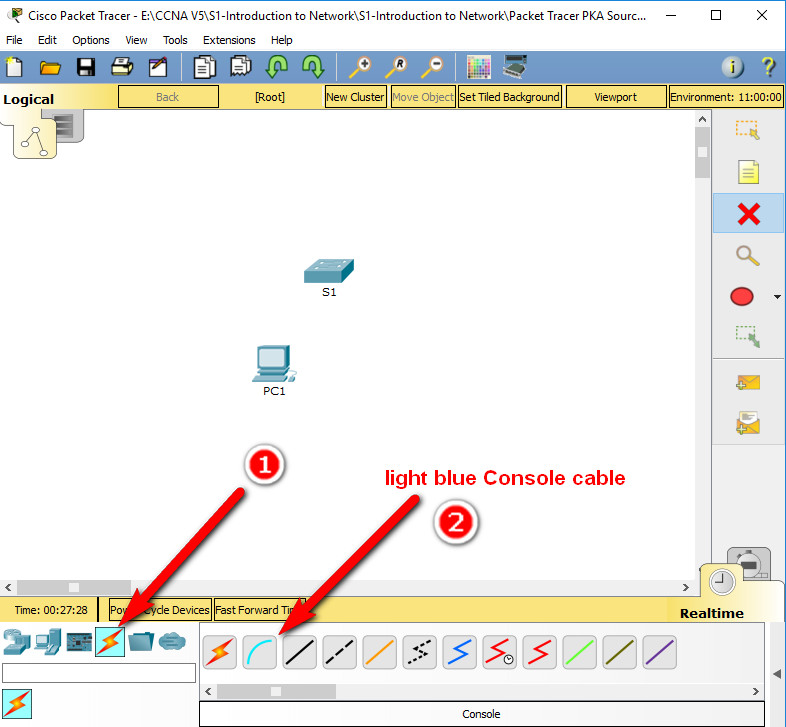
2:
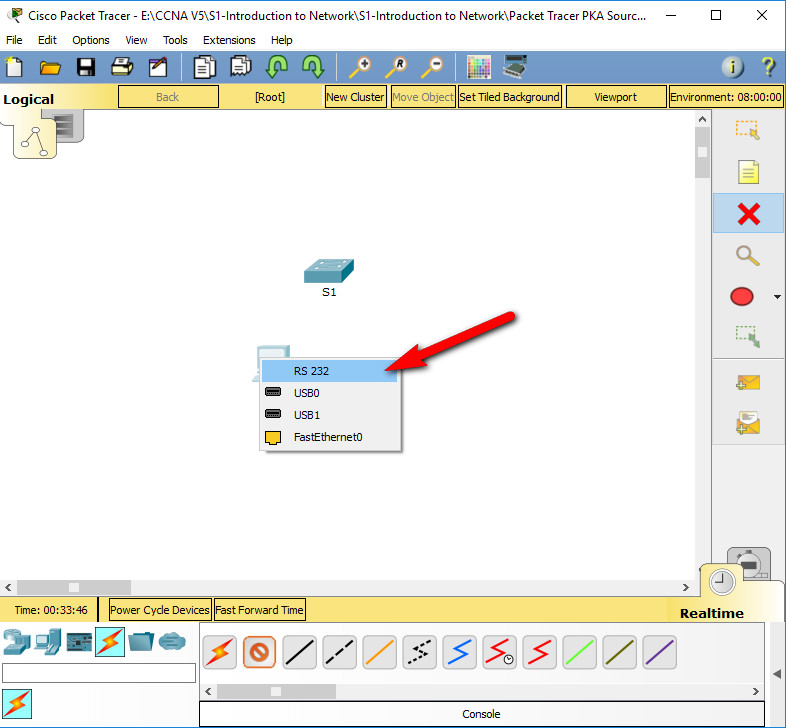
3:
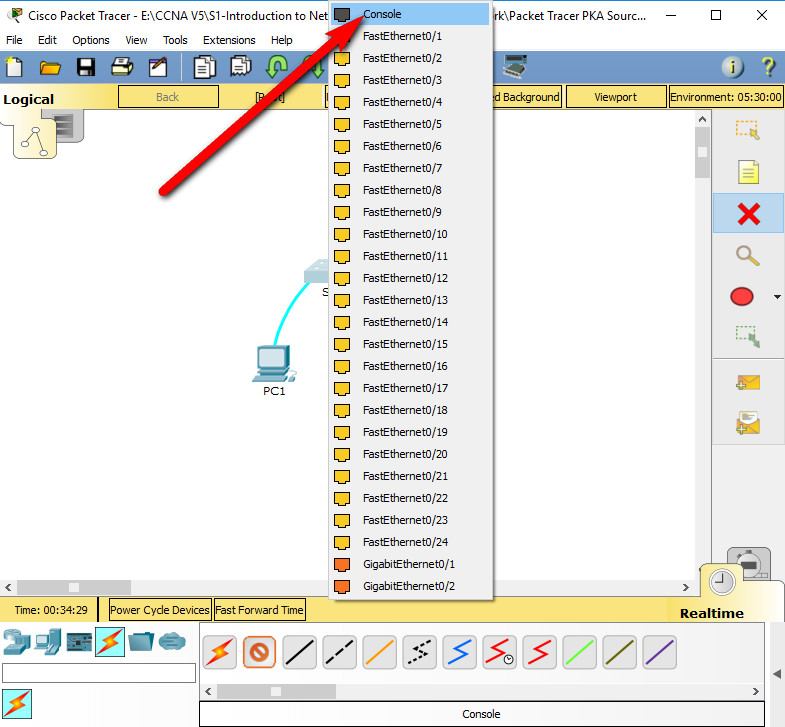
Étape 2: Établir une session de terminal avec S1.
a. Cliquez sur PC1, puis sélectionnez l’onglet Desktop.
b. Cliquez sur l’icône d’application Terminal; vérifiez que les paramètres par défaut de Port Configuration sont corrects.
Quel est le paramètre en bits par seconde?
9600
c. Cliquez sur OK.
d. L’écran qui s’affiche peut avoir plusieurs messages affichés. Quelque part sur l’écran, il devrait y avoir un message Press RETURN to get started!. Appuyez sur ENTER.
Quel est l’invite affichée à l’écran?
S1>
Étape 3: Explorer l’Aide du IOS.
a. Le IOS peut fournir une aide pour les commandes selon le niveau auquel on y accède. L’invite actuellement affichée est appelée User EXEC et le dispositif attend une commande. La forme la plus basique d’aide est de taper un point d’interrogation (?) à l’invite pour afficher une liste de commandes.
S1> ?
Quelle commande commence par la lettre ‘C’?
connect
b. À l’invite, tapez t, suivi d’un point d’interrogation (?).
S1> t?
Quelles commandes sont affichées?
telnet terminal traceroute
c. À l’invite, tapez te, suivi d’un point d’interrogation (?).
S1> te?
Quelles commandes sont affichées?
telnet terminal
Ce type d’aide est connu sous le nom d’aide contextuelle, fournissant plus d’informations à mesure que les commandes sont développées.
Partie 2: Exploration des modes EXEC
Dans la Partie 2 de cette activité, vous passez en mode EXEC privilégié et émettez des commandes supplémentaires.
Étape 1: Entrer en mode EXEC privilégié.
a. À l’invite, tapez le point d’interrogation (?).
S1> ?
Quelle information est affichée pour décrire la commande enable?
Turn on privileged commands
b. Tapez en et appuyez sur la touche Tab.
S1> en
Qu’est-ce qui s’affiche après avoir appuyé sur la touche Tab?
enable
Cela s’appelle la complétion de commande ou complétion par Tab. Lorsqu’une partie d’une commande est tapée, la touche Tab peut être utilisée pour compléter la commande partielle. Si les caractères tapés sont suffisants pour identifier la commande de manière unique, comme dans le cas de la commande enable, la partie restante est affichée.
Que se passerait-il si vous tapiez te et appuyiez sur Tab à l’invite?
Il y a plus d’une commande qui commence par les lettres ‘te’ car ‘te’ ne fournit pas suffisamment de caractères pour identifier la commande de manière unique. Les caractères continueront à s’afficher, invitant l’utilisateur à saisir des caractères supplémentaires pour identifier la commande de manière unique.
c. Entrez la commande enable et appuyez sur ENTER.
Comment l’invite change-t-elle?
Elle passe de S1> à S1#, ce qui indique le mode EXEC privilégié.
d. Lorsque vous y êtes invité, tapez le point d’interrogation (?).
S1# ?
Une commande commence par la lettre ‘C’ en mode user EXEC.
Combien de commandes sont affichées maintenant que le mode EXEC privilégié est actif? (Conseil: vous pouvez taper c? pour lister uniquement les commandes commençant par ‘C’.)
5 – clear, clock, configure, connect et copy
Étape 2: Entrer en mode de configuration globale
a. En mode EXEC privilégié, l’une des commandes commençant par la lettre ‘C’ est configure. Tapez soit la commande complète, soit suffisamment de caractères pour la rendre unique. Appuyez sur la touche Tab pour émettre la commande et appuyez sur ENTER.
S1# configure
Quel est le message qui s’affiche?
Configuring from terminal, memory, or network [terminal]?
b. Appuyez sur Enter pour accepter le paramètre par défaut qui est entre crochets [terminal].
Comment l’invite change-t-elle?
S1(config)#
c. C’est le mode de configuration globale. Ce mode sera exploré plus en détail dans les activités et laboratoires à venir. Pour l’instant, revenez au mode EXEC privilégié en tapant end, exit ou Ctrl-Z.
S1(config)# exit
S1#
Partie 3: Réglage de l’horloge
Étape 1: Utiliser la commande clock.
a. Utilisez la commande clock pour explorer davantage l’aide et la syntaxe des commandes. Tapez show clock à l’invite du mode EXEC privilégié.
S1# show clock
Quelle information est affichée? Quelle est l’année affichée?
UTC Mon Mar 1 1993 précédé des heures, minutes et secondes écoulées depuis le démarrage du dispositif. L’année est 1993.
b. Utilisez l’aide contextuelle et la commande clock pour régler l’heure sur le commutateur à l’heure actuelle. Entrez la commande clock et appuyez sur ENTER.
S1# clock
Quelle information est affichée?
% Incomplete command
c. Le message % Incomplete command est renvoyé par le IOS indiquant que la commande clock nécessite des paramètres supplémentaires. Chaque fois que plus d’informations sont nécessaires, une aide peut être fournie en tapant un espace après la commande et le point d’interrogation (?).
S1# clock ?
Quelle information est affichée?
set Set the time and date
d. Réglez l’horloge en utilisant la commande clock set. Procédez avec la commande une étape à la fois.
S1# clock set ?
Quelle information est demandée?
hh:mm:ss Current Time
Qu’est-ce qui aurait été affiché si seulement la commande clock set avait été saisie, sans demande d’aide par le point d’interrogation?
% Incomplete command
e. Sur la base des informations demandées en émettant la commande clock set ?, entrez une heure de 15h00 en utilisant le format 24 heures de 15:00:00. Vérifiez si des paramètres supplémentaires sont nécessaires.
S1# clock set 15:00:00 ?
La sortie renvoie la demande de plus d’informations:
<1-31>  Day of the month
MONTH   Month of the year
f. Essayez de régler la date au 01/31/2035 en utilisant le format demandé. Il peut être nécessaire de demander une aide supplémentaire en utilisant l’aide contextuelle pour terminer le processus. Une fois terminé, émettez la commande show clock pour afficher le réglage de l’horloge. La sortie de la commande résultante devrait s’afficher comme:
S1# show clock
*15:0:4.869 UTC Tue Jan 31 2035
g. Si vous n’avez pas réussi, essayez la commande suivante pour obtenir la sortie ci-dessus:
S1# clock set 15:00:00 31 Jan 2035
Étape 2: Explorer les messages de commande supplémentaires.
a. Le IOS fournit diverses sorties pour les commandes incorrectes ou incomplètes, comme vous l’avez constaté dans les sections précédentes. Continuez à utiliser la commande clock pour explorer les messages supplémentaires qui peuvent être rencontrés au fur et à mesure que vous apprenez à utiliser le IOS.
b. Émettez la commande suivante et enregistrez les messages:
S1# cl (tab)
Quelle information a été renvoyée?
% Ambiguous command: « cl »
S1# clock
Quelle information a été renvoyée?
% Incomplete command.
S1# clock set 25:00:00
Quelle information a été renvoyée?
S1#clock set 25:00:00
^
% Invalid input detected at '^' marker.
S1# clock set 15:00:00 32
Quelle information a été renvoyée?
S1#clock set 15:00:00 32
^
% Invalid input detected at '^' marker.
